I can hardly believe that 2012 is coming to a close and 2013 is almost here. Where did the time go? I think I always feel this way and time seems to move faster every year. 2012 has been wonderful and our family has been truly blest.
I don't make New Year's Resolutions but I do set goals to accomplish in the New Year. I'll start with some quilts I'd like to complete in 2013. Some are so close and others will take months to finish but I enjoy lists - making them and checking things off - so here goes. At least it is something to work towards with my quilting.
1. Evelyn's Album - Summer BOW
2. Chelsea Wallhanging
3. Easy Street Mystery Quilt
4. Bright Baby Quilt for Lacey
5. Rocky Mountain Puzzle Quilt - Summer BOW
6. Flower Pots Applique Quilt
7. Fuschia and Yellow Mile a Minute Strippy Quilt
8. Little Houses Quilt
9. Peaches and Green Contemporary Quilt
10. Christmas BOM Quilt
11. Batik Baby Quilt
12. Evening Blooms - Country Inn
A couple of these quilt tops are ready for quilting but others have a long way to go for completion. At least it's in black and white now and I can refer to the list and hopefully check them all off this year.
What I mostly want to accomplish with quilting in 2013 is to work more improvisationally and liberated. I see so many quilts I'd like to make but I also love the challenge of working and playing with fabric and just seeing "what if"? We never know until we try.
Happy New Year and may God richly bless you in 2013! A New Year, a new slate, new goals! How exciting!

Quilting by Judith - Sharing my quilts and bits of my life.
Monday, December 31, 2012
Friday, December 21, 2012
Easy Street Mystery Quilt Part 5

This may be all I get done this week so I decided to go ahead and get my cutting done early this morning. Have I mentioned that turquoise has been an all-time favorite color of mine since I was a child? There is some sewing but it's simple. Check it out at Easy Street!
It has turned very cold here in the south but I think it's very fitting. After all, today is Winter Solstice and winter is finally here. Happy Stitching if you get a chance!
Monday, December 17, 2012
Easy Street Mystery Quilt Part 4

Somehow I managed to find the time to sew this weekend and get all of my flying geese made and sewn to the black and white flying geese. I used the Companion and Easy Angle but still had to do just a tiny trimming up. Maybe it didn't seem so difficult as there was only half as many geese this time - 64 instead of 128.

I even got all of my green squares cut! I'm pretty fond of all those bright greens!

Here are my greens and turquoises and purples together!

And now, add the gray and they are all nicely stored together, waiting for the next clue from Bonnie's Easy Street!
Thursday, December 13, 2012
Easy Street Mystery Quilt Part 3

I managed to get my 64 shaded nine patches finished! I got pretty behind this week but a little sewing this afternoon got them all finished. I sewed them just as Bonnie instructed and they have turned out rather accurately.
My flying geese from last week were accurate but it was a whole lot of trimming by using the Wing Clipper Tool so I don't know if I'd do them that way again.
Let's see what Bonnie has for us tomorrow!
Monday, December 10, 2012
Easy Street & Christmas!

Here are my flying geese from Part 2 of Easy Street. I've not begun the next step. I was too busy singing in a Living Christmas Tree this weekend which was wonderful.

Speaking of Christmas, here is the completed Christmas tablecloth I worked on a few weeks ago.

And here's a photo of my first Christmas quilt, made in the 1980s. All different stars and hand quilted with stars and a cable border. Some of these leftover fabrics were used in the tablecloth above. Seriously! You can see the poinsettia sashing squares fabric in the tablecloth picture. I think the fabric had aged long enough!!

And when I've had a chance, I've done a little stitching on the 'finishing kit' from the SBOW, aka Evelyn's Album from Primitive Gatherings. One more block to stitch and then I need to put a design in all the stars. So far I just have one of those done. The heart has simply a blanket stitch with a few hundred french knots. Next is the border. Happy Stitching!
Monday, December 3, 2012
Easy Street Mystery Quilt Part 2

Here are my purples all laid out for my flying geese. These are for Bonnie Hunter's Easy Street Mystery Quilt Part 2.

Here are the flying geese I finished yesterday and below is the following method I used to make them.

I used this ruler/tool called a Wing Clipper. I had learned to use it in a class earlier this year and it makes very accurate flying geese. It has instructions for ten different sizes of flying geese.

For finished flying geese of 1 1/2" x 3", you begin with a 4 1/2"purple square and two 2 1/2" black and white squares. This (plus two more black and white squares) will make four flying geese.

Lay your black and white squares on opposite sides of the purple square, just in from the corner edge. The instructions with the ruler suggest drawing a line on opposite sides of this center line drawn. I just sewed a 1/4" away using my 1/4" foot as a guide.

Here are my sewn lines on either side.
Cut apart down the center with a rotary cutter.

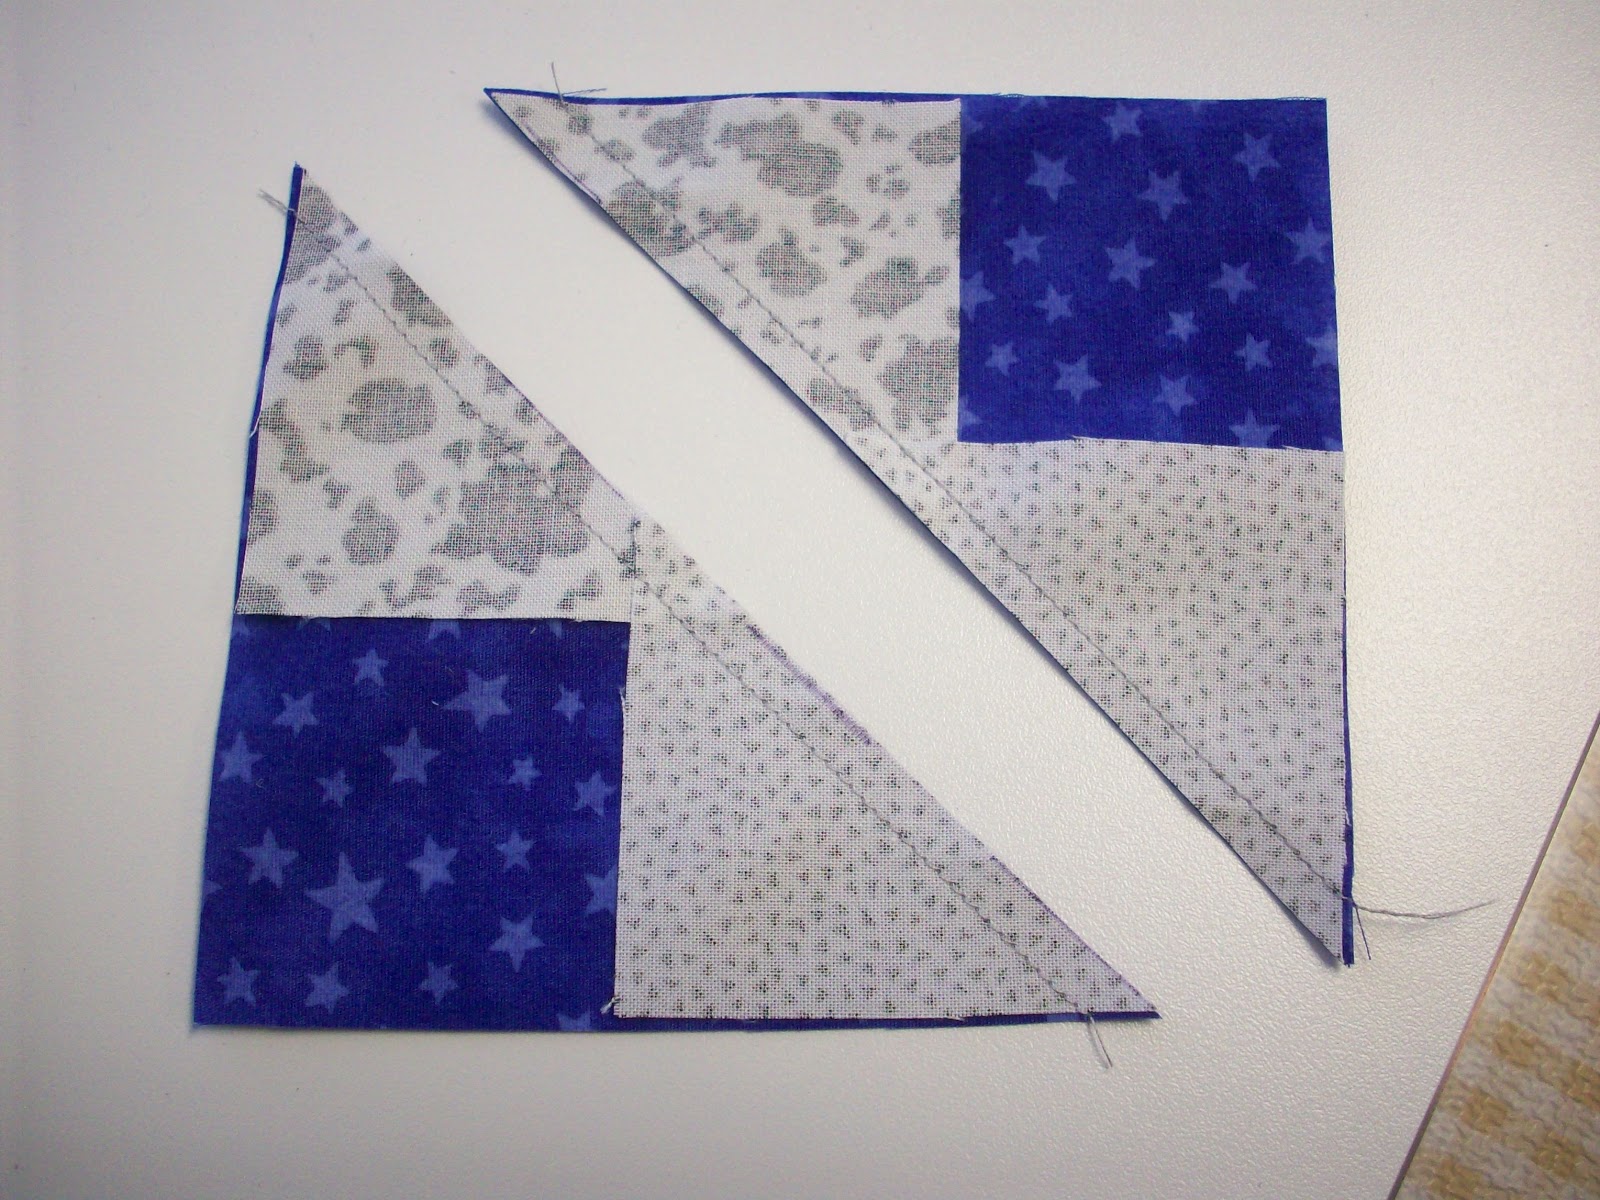
Press flat then press towards the black and white squares.

Now you add another black and white square to the purple corner, again, bringing it in 1/16" of an inch. It is important to do this. If you don't bring it in enough then your flying geese won't trim up properly.

Mark the lines and sew again, just as before.

Cut apart and press to the black and white triangles.

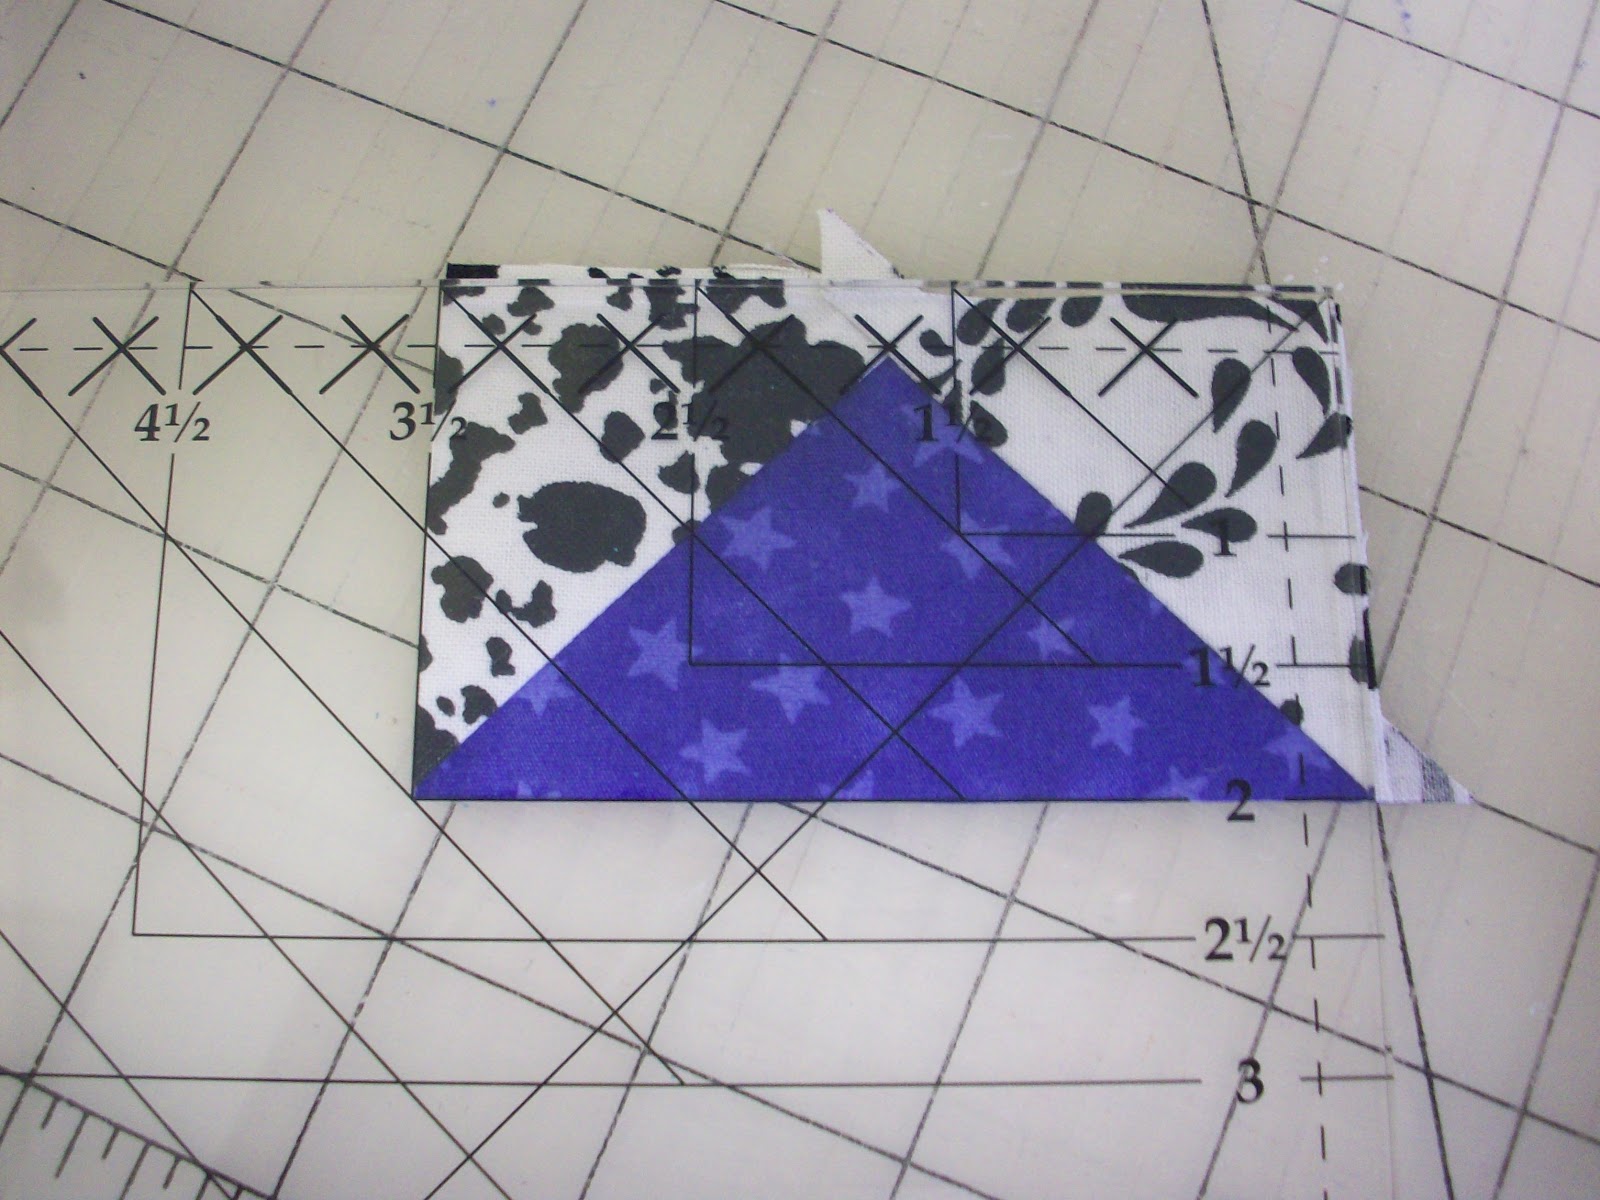
Now you are ready to square up the flying geese with the Wing Clipper Tool.

Line it up with the valley towards you along the proper lines. It is clearly marked. Trim the right side and top right of the flying geese.
Rotate around 180 degrees and trim the opposite side.

There you have a perfect sized flying geese - well, actually four!

It seemed a little tedious at first because I had to remember the steps but once I got in my mind how to line the squares up every time it moved along pretty quickly, especially with chain piecing.

However, I don't really like to draw diagonal lines on fabric. Just one of those things I don't care to do. So, here is another tool that eliminates that step completely.

It is the Clearly Perfect Angles Sheet. It's a thin plastic that clings to your sewing machine top and table. There are good instructions for aligning it with your machine.

You cut a little rectangle out of the center when you first purchase it and line it up on your machine so the 'hole' is where your feed dogs are. There are lines for a center cut or 1/4" seam on either side and that is what I used. Just lined the pieces to the left of the 'gray' line, watch the bottom where you are feeding it into the machine and sew away. No marking and it goes well.

Whoops, I made an error on one set. Got in a hurry and forgot to press my black and white squares open before I added those on the second corner. Oh well, I cut a few extra anyway - LOL! Happy Stitching, to those doing the mystery quilt!
Saturday, December 1, 2012
Easy Street Part 1 Four Patches

Here are all 191 four patches of my Easy Street Mystery Quilt by Bonnie Hunter!! I had a few extra but that helps when you get down to the end and need to choose 'which set' works near another.

I did not have enough black and white fabrics so added a few more yesterday. Now it's time to begin making the flying geese for part 2.
Monday, November 26, 2012
Easy Street Part 1

I have my strips cut and have begun sewing!

I think my solid gray is going to work out just fine. I was a little concerned but like the results.

Bonnie Hunter has a neat way to show you how to have your seam allowances 'twirl' on the back. I tried it and it works great! To find out more about this pattern, click HERE! My color choices are in my previous post.
Sunday, November 25, 2012
Easy Street Mystery Quilt!

I decided to try doing Bonnie Hunter's Mystery Quilt one more time. So far, I've never seemed to have gotten past Clue 1 or 2 in other years, or just gathering the fabrics. She suggested using paint chips for the colors IF you wanted to follow her color scheme, which I did. So, searching in my stash, here are the turquoises and aquas that I came across.

Purples and violets!

More purples with a touch of periwinkle it seems.

Lots of limey green which I do like!

These were my grays before I went by the quilt shop to get a color that worked better. I had some really light gray but nothing that I thought would work.

And now I'm trying a solid gray......I don't do solids much so we'll see. Guess I've been quilting so long that I remember the excitement when we got away from solids - lol!

And some black and white prints. Some others in my small group are doing this also so I think it will be fun. I cut some strips for step 1 so am ready to get started!
Sunday, November 18, 2012
Christmas Tablecloth

It all began with four blocks that were made close to 20 years ago. Our guild had a Christmas block challenge using 3 fabrics. I entered the challenge and won four blocks. The crazy quilt block by machine is the one I made. For many years I've looked at these blocks but could not decide what to do with them - only 4. But this year..........I made a decision!!

I pulled all my Christmas scraps out, several of them are over 20 years and are even in the block I made. Some are very new that were given to me a year or two ago and very 'modern'. I decided to see if I could combine them and make an interesting quilt.

I used the book Happy Hour by Atkinson Designs and the pattern Triple Treat Petite, except that I made 12" blocks because that was the size of my 4 blocks. I just worked out the sizing in EQ7 as well as I could. Oh, and I ended up putting the 4 blocks on the four corners. I'll post another picture once it's complete but just wanted to share this now.

Here is a very new fabric in the front and some very old fabrics right behind it.

I personally like the mixture because of the memories it brings back to me of the different fabrics used in the past or given to me. Now it's quilted and ready for a red binding.

Just one more close up of the quilting design. We have placemats made by my mother-in-law with the candy cane fabric on the green background.........more special memories!!
Wednesday, November 14, 2012
Pretty Shades of Fall


Subscribe to:
Posts (Atom)